> ## Documentation Index
> Fetch the complete documentation index at: https://developer.quicko.com/llms.txt
> Use this file to discover all available pages before exploring further.
# Connect
> Advanced integration workflow with consent-based access to user data via Open APIs
This requires a more hands-on approach from the channel partner's development team. It is suitable for partners who desire a more integrated solution with consent-based access to user data via open APIs.
 ## Open API Access
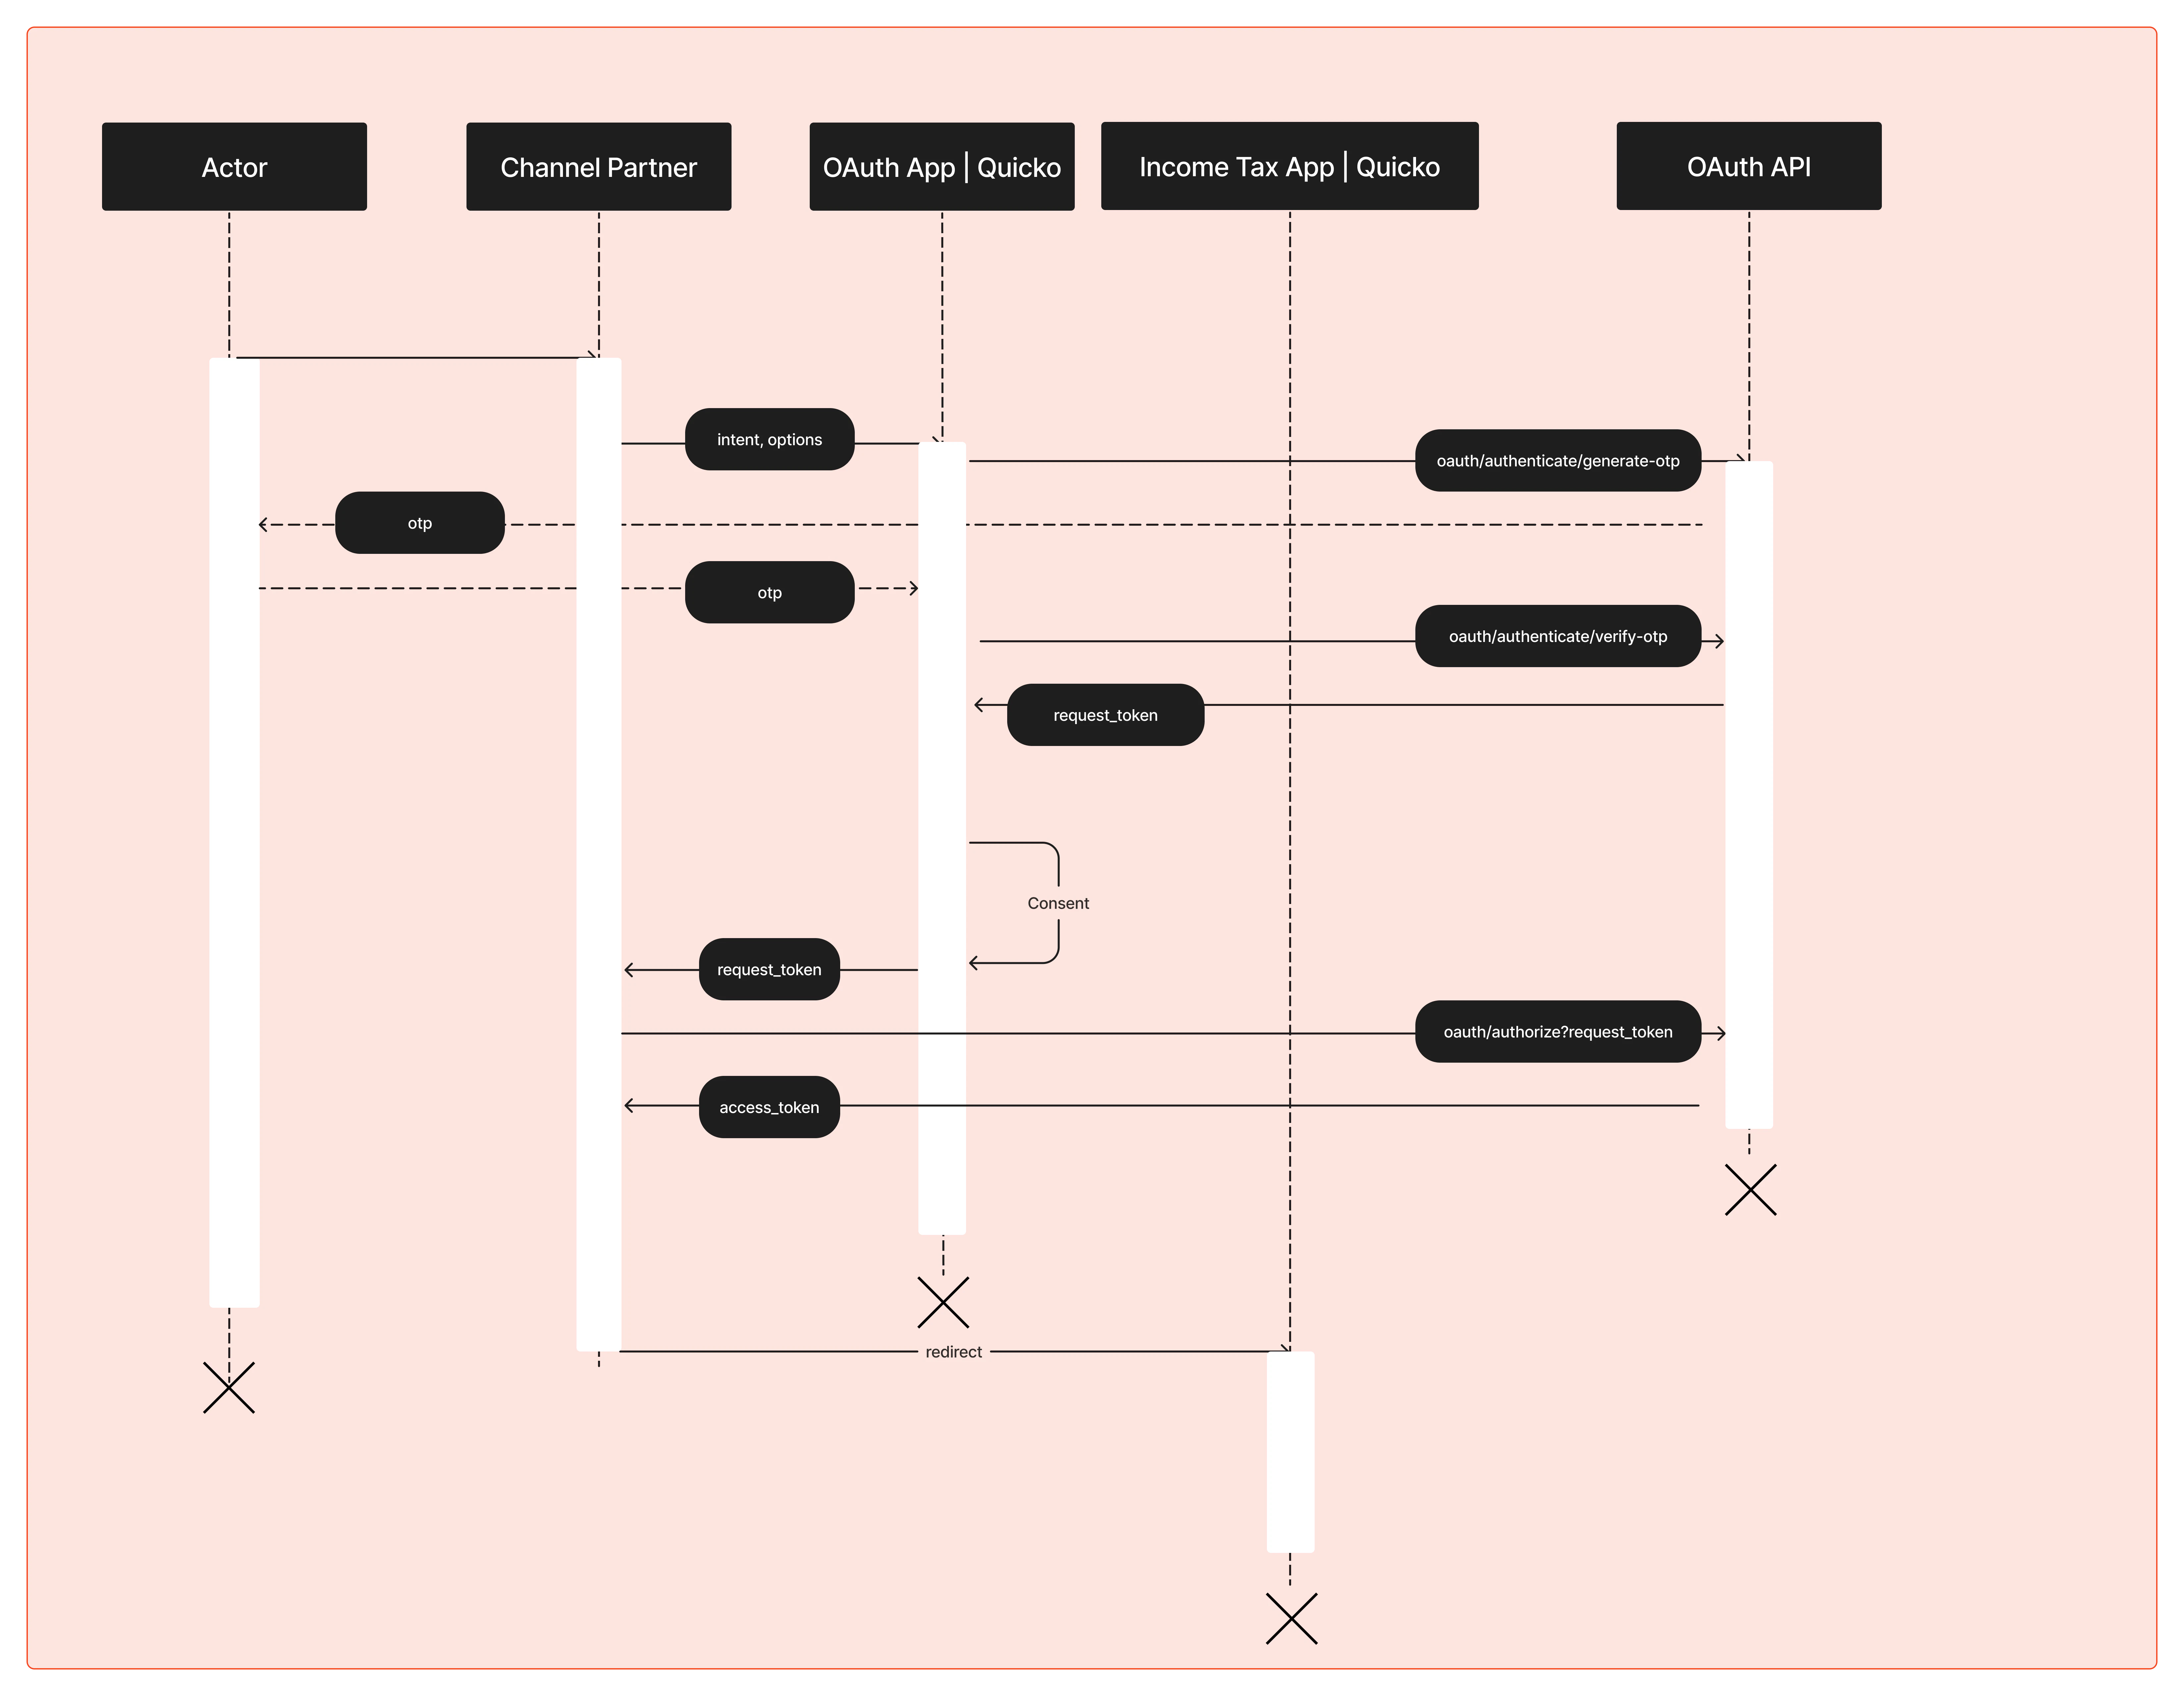
In the context of integrating with open APIs, it is crucial to understand that obtaining an access token, which includes user consent, is a fundamental requirement. This process ensures that all interactions with the API are secure and authorized by the user. It's important to note that the workflow for integrating these APIs into a web environment is slightly different compared to mobile integration. This document will provide a clear guide on how to effectively implement the workflow for web integration while adhering to the necessary security protocols and user consent guidelines.
## Workflow Overview
The Host app initiates the OAuth flow by redirecting the user to Quicko OAuth with a properly constructed URL including an options object that is base64 encoded.
The user grants consent on Quicko's OAuth app for data sharing.
Upon successful consent, Quicko redirects back to the Host app with a `request_token`. The Host app exchanges this token for an access token.
With the access token, the Host app can now access the user's Quicko data.
Finally, the Host redirects the user to Quicko's Income Tax Web App to proceed with their tax-related activities.
## Step-by-Step Integration
### 1. Redirect to Quicko OAuth
Construct a redirect URL to Quicko's OAuth endpoint. Include your `api_key` and the `redirect` (the URL to which Quicko will send the user after authorization) and an `options` query parameter, which is a base64-encoded JSON object containing user details and theme preferences.
#### Options Object
Here is the JSON structure of the options object:
```json theme={null}
{
"user": {
"email": "[email protected]",
"mobile": {
"isd": "91",
"number": "XXXXXXXXXX"
}
},
"theme": {
"mode": "dark",
"seed": "#2962FF"
},
"intent": "SAVE" | "PAY" | "FILE" | "TRACK"
}
```
Encode this JSON object in base64 and append it as a query parameter to the OAuth URL.
Additionally, to mark the user as an affiliate of your platform, you'll need to pass an `ref` query parameter.
**Sample URL:**
```text theme={null}
https://oauth.quicko.com/?api_key={{your_api_key}}&redirect={{base64_encoded_host_redirect}}&ref={{your_affiliate_id}}&options=eyJ1c2VyIjp7ImVtYWlsIjoidXNlckBtYWlsLmNvbSIsIm1vYmlsZSI6eyJpc2QiOiI5MSIsIm51bWJlciI6IlhYWFhYWFhYWFgifX0sInRoZW1lIjp7Im1vZGUiOiJkYXJrIiwic2VlZCI6IiMyOTYyRkYifSwiaW50ZW50IjoiRklMRSJ9
```
### 2. User Consent
When the user is redirected to Quicko's OAuth endpoint, they will be presented with the consent screen. Upon granting consent, Quicko will redirect the user back to your `redirect`.
### 3. Handle the Redirect
Upon user consent, Quicko redirects the user to your `redirect` with a `request_token`. If the user denies consent, they will be redirected back with a query parameter `status` set to `cancelled`.
For example, if the host's `redirect` is `host-app.com/incoming`, the user will be redirected to:
```text theme={null}
https://host-app.com/incoming?status=cancelled
```
```text theme={null}
https://host-app.com/incoming?status=success&request_token={{token}}
```
#### Handling Denial of Consent
If a user denies consent, handle the redirection with the `status` parameter appropriately in your application flow, typically by presenting an appropriate message to the user or offering the option to retry the authorization process.
### 4. Exchange Request Token
Your server should exchange the `request_token` for an access token by making a server-side request to Quicko's token exchange endpoint. Store this access token securely on your server for subsequent requests to Quicko's APIs.
You can use the OAuth Authorize API for this exchange.
### 5. Redirect to Income Tax Web App
With the access token, query the user's data as needed. Then, to continue their tax journey, redirect the user to Quicko's Income Tax Web App.
**URL:** `https://it.quicko.com`
## Recommendations
Always ensure the `access_token` is stored securely on your server. Never expose it in client-side code or public repositories.
Regularly listen to event postbacks from Quicko's services to keep track of the user's journey and take appropriate actions.
## Open API Access
In the context of integrating with open APIs, it is crucial to understand that obtaining an access token, which includes user consent, is a fundamental requirement. This process ensures that all interactions with the API are secure and authorized by the user. It's important to note that the workflow for integrating these APIs into a web environment is slightly different compared to mobile integration. This document will provide a clear guide on how to effectively implement the workflow for web integration while adhering to the necessary security protocols and user consent guidelines.
## Workflow Overview
The Host app initiates the OAuth flow by redirecting the user to Quicko OAuth with a properly constructed URL including an options object that is base64 encoded.
The user grants consent on Quicko's OAuth app for data sharing.
Upon successful consent, Quicko redirects back to the Host app with a `request_token`. The Host app exchanges this token for an access token.
With the access token, the Host app can now access the user's Quicko data.
Finally, the Host redirects the user to Quicko's Income Tax Web App to proceed with their tax-related activities.
## Step-by-Step Integration
### 1. Redirect to Quicko OAuth
Construct a redirect URL to Quicko's OAuth endpoint. Include your `api_key` and the `redirect` (the URL to which Quicko will send the user after authorization) and an `options` query parameter, which is a base64-encoded JSON object containing user details and theme preferences.
#### Options Object
Here is the JSON structure of the options object:
```json theme={null}
{
"user": {
"email": "[email protected]",
"mobile": {
"isd": "91",
"number": "XXXXXXXXXX"
}
},
"theme": {
"mode": "dark",
"seed": "#2962FF"
},
"intent": "SAVE" | "PAY" | "FILE" | "TRACK"
}
```
Encode this JSON object in base64 and append it as a query parameter to the OAuth URL.
Additionally, to mark the user as an affiliate of your platform, you'll need to pass an `ref` query parameter.
**Sample URL:**
```text theme={null}
https://oauth.quicko.com/?api_key={{your_api_key}}&redirect={{base64_encoded_host_redirect}}&ref={{your_affiliate_id}}&options=eyJ1c2VyIjp7ImVtYWlsIjoidXNlckBtYWlsLmNvbSIsIm1vYmlsZSI6eyJpc2QiOiI5MSIsIm51bWJlciI6IlhYWFhYWFhYWFgifX0sInRoZW1lIjp7Im1vZGUiOiJkYXJrIiwic2VlZCI6IiMyOTYyRkYifSwiaW50ZW50IjoiRklMRSJ9
```
### 2. User Consent
When the user is redirected to Quicko's OAuth endpoint, they will be presented with the consent screen. Upon granting consent, Quicko will redirect the user back to your `redirect`.
### 3. Handle the Redirect
Upon user consent, Quicko redirects the user to your `redirect` with a `request_token`. If the user denies consent, they will be redirected back with a query parameter `status` set to `cancelled`.
For example, if the host's `redirect` is `host-app.com/incoming`, the user will be redirected to:
```text theme={null}
https://host-app.com/incoming?status=cancelled
```
```text theme={null}
https://host-app.com/incoming?status=success&request_token={{token}}
```
#### Handling Denial of Consent
If a user denies consent, handle the redirection with the `status` parameter appropriately in your application flow, typically by presenting an appropriate message to the user or offering the option to retry the authorization process.
### 4. Exchange Request Token
Your server should exchange the `request_token` for an access token by making a server-side request to Quicko's token exchange endpoint. Store this access token securely on your server for subsequent requests to Quicko's APIs.
You can use the OAuth Authorize API for this exchange.
### 5. Redirect to Income Tax Web App
With the access token, query the user's data as needed. Then, to continue their tax journey, redirect the user to Quicko's Income Tax Web App.
**URL:** `https://it.quicko.com`
## Recommendations
Always ensure the `access_token` is stored securely on your server. Never expose it in client-side code or public repositories.
Regularly listen to event postbacks from Quicko's services to keep track of the user's journey and take appropriate actions.